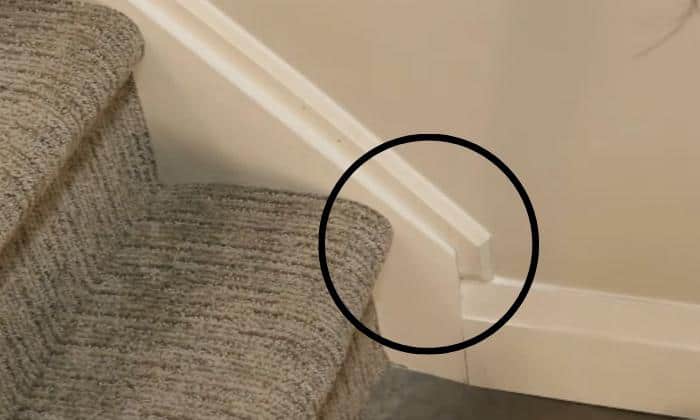
Gaps appearing between the stair tread and the walls is not an uncommon occurrence. However, this doesn’t make it any less annoying to see the crevices running along the riser and tread every time you go up or downstairs.
Fortunately, this isn’t a problem you can’t fix. If installing light strips within the crack to turn the imperfection into a feature doesn’t sound appealing, learn how to fix a gap between stair tread and wall to tackle the issue yourself.
In this article, we’ll walk you through 3 easy methods to hide crevices between stair and wall.
Table of Contents
Ways to Fix a Gap Between Stair Tread and Wall
Method 1. Use caulk
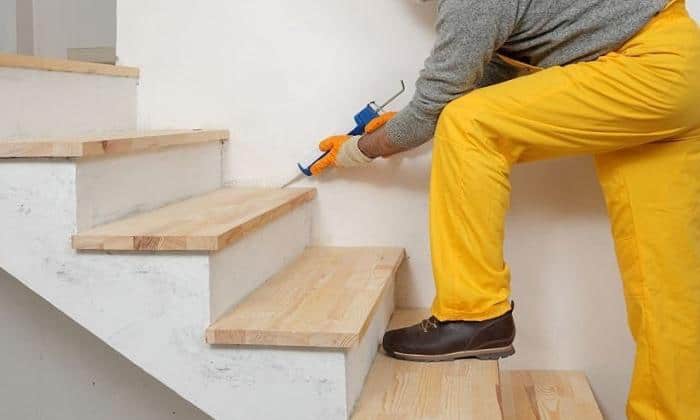
Using a gap filler, such as caulk, is the easiest method to cover crevices in the stair. It’s also ideal for hiding the gap between stair tread and riser or filling in stair risers. However, it’s most suitable for hairline cracks around 0.25 inch, as larger gaps will require backer rods before application.
Caulk is relatively easy to apply; it’s also more affordable than expanding foam – another popular filler for fixing a gap between stair stringer and wall.
What to prepare
- Latex caulk
- Caulking gun
- Painter’s tape
- Backer rod
- Brush/vacuum
- Spare cardboard
- Covering sheet
- Paint
Step 1: Prepare the working area

While this method to fill gaps between stairs and wall is pretty straightforward, you don’t want the filler to catch dirt or make a mess everywhere. This is where preparation comes in.
- Brush away debris on the steps – be careful not to let any fall into the gap. Alternatively, use a vacuum for more efficiency. Don’t forget to clean the gap as well.
- Apply painter’s tape along the crack to make sure the filler doesn’t spread onto the steps. Put a covering sheet onto the stairs for good measure.
Step 2: Apply the caulk
Although you can forgo applicator guns, I strongly advise against doing so, especially if you want a smooth and even finish. Plus, you’ll need to be extra careful to apply the substance properly.
- When using caulk, a backer rod is necessary to control the sealant depth when the hole is between 0.25”-0.5”. Note that the backer rod needs to be 0.25” bigger than the gap to ensure a tight fit.
- Assemble the filler tube with the applicator.
- Trim the caulk tube at a 45° angle for easier
- Apply the stair gap filler on a piece of cardboard for a test run. Repeat this step a few times until you can apply pressure steadily enough to form an even bead.
- Press the nozzle to the gap and gently squeeze the gun’s trigger. As you do so, steadily pull the gun toward you – do not change direction. Always caulk from one end to another.
- Drag a caulk finishing tool (or a finger dipped in a soapy solution) over the filler to get a smooth finish.
Step 3: Finish the job
By now, you’re almost done with your task to fill gaps in wood stairs. What you need to do now mostly involves cleaning up.
- Clean the spilled caulk with a damp towel. If it has dried and doesn’t come off, scrape it away with a putty knife, but not before softening the filler with white vinegar
- Leave the caulk to air dry according to the instructions on its label. 24 hours are the average waiting time for the substance to cure.
- Paint the caulk. (optional)
- Peel off the painter’s tape and put the covering sheet away.
Method 2: Use expanding foam
Aside from caulk, expanding foam is another filler that can help you fix stairs with gaps. The substance can be used to fill large gaps in stairs that caulk can’t repair – up to 3 inches. Also, expanding foam can seal gaps tighter and last much longer.
What to prepare
- Expanding foam
- Expanding foam applicator gun
- Painter’s tape
- Brush/vacuum
- Disposable gloves
- Covering sheet
- Paint
- Utility knife/metal scraper
- Sanding block
Step 1: Preparation
The preparation of this solution is the same as step 1 in the method above.
Step 2: Apply the expanding foam
Expanding foam cans usually come with a plastic nozzle. However, I’d recommend using the applicator gun, considering the substance may set in the built-in applicator before you’re done with the job.
- Wear disposable gloves before handling the foam.
- Assemble the applicator gun according to the manufacturer’s instructions.
- Spray the gap with water to make the substance cure faster.
- Give the can a few hard shakes for 15 seconds.
- Hold the applicator gun so the can is upside down for optimal results. If that’s not possible, positioning the foam can at any angle is also acceptable, as long as the nozzle is away from your face.
- Slowly apply foam into the gap. Be careful not to overdo it to prevent the product from expanding all over your stair and wall.
- Wait 12 hours for the filler to cure partially.
Step 3: Clean up
Because foam can expand up to 2.5 times its size, you’re bound to do some cleaning up.
- Cut through the expanded foam with a utility knife or a metal scraper.
- Sand the foam with a sanding block to create a smooth finish.
- Paint the filler to better hide gaps in stair treads.
- Remove the painter’s tape and covering sheet.
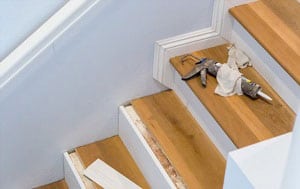
Method 3. Add trim
For particularly large gaps, installing trims would be the best choice. If you also have gaps on the finish side of stairs, this method will prove an excellent solution as well.
What to prepare
- Trims
- Measuring tape
- Miter saw
- 180-grit sandpaper
- Finishing nailer
- Protective glasses
- Dust mask
- Ear muff
- Clean cloth
- Wood filler for stair gaps
- Paint
Step 1: Measure and select trims
Adding trim is the best method if you also want to enhance the stairs’ aesthetic. So, I’d suggest getting one that fits your home decor. Color and style asides, trims are available in 4 materials: wood, tile, PVC, and MDF.
- Use a measuring tape to measure the stair’s dimensions as well as the crevices between treads and walls. Select trims wide enough to sufficiently cover all the gaps.
- Add 10% to the overall trim length to account for errors.
- Determine what trim joining method best suits your stairs. The easiest one would be the butt joint, but it won’t be suitable for outside corners. The other technique, called the scarf joint, involves cutting the trim at a 45° angle.
Step 2: Cut and assemble the trims
Now that you’ve mapped out everything, you can start cutting the trim. Use a miter saw to ensure precise and easy cuts. Don’t forget safety measures – always wear protective glasses, ear muff, and a dust mask while handling the saw.
- Lay the trims on the miter saw’s bed and start cutting according to your measurements. Keep your hands 6 inches away from the blade.
- Place the cut pieces onto the stairs without gluing them in place to see how they fit. Make adjustments if necessary.
- Mount the molding to the wall with a finishing nailer. The nail should be 3 times as long as the trim is thick, which sets its ideal length around 2 to 2.5 inches.
Step 3: Touch up the trims
As the installation involves shooting nails into the wall, there will be noticeable holes in the trim boards. You can rectify this with wood filler, available in water- and solvent-based formulas. The former is easier to apply, whereas the latter is more durable.
- Identify gaps and nail holes in the trim.
- Apply wood fillers into the gaps. When dealing with small holes, use your finger to spread the substance and wipe away the excess with a damp towel.
- Wait 30 minutes to 2 hours for the wood filler to dry, then smooth the filled holes with 180-grit sandpaper.
- Clean the sanding dust by gently rubbing the trim with a clean cloth.
- Paint the trim. (optional)
Why is There a Gap Between the Stairs and the Wall?
The main reasons for stairs separating from wall are:
- Complicated installation process that makes snugly fit stairs impossible.
- Your house’s weight can be pressing down on the soil, resulting in a uniform settlement that slightly sags the foundation. However, if there are signs of wall cracks, torn wallpapers, and sloping floors, contact a foundation specialist first.
- Continual exposure to moisture, long-term use, or fluctuating temperatures can change the stairs’ or building material’s structure.
- Heavy weights can put enough stress on the step to slightly pull apart the stair tread and skirt board (or wall).
Conclusion
That’s about it; you’ve learned how to fix a gap between stair tread and wall. As it turns out, this process is relatively straightforward.
To summarize, there are three main ways to tackle the issue: sealing with caulk, filling with expanding foam, or adding trim. The last method, while more complicated and time-consuming, is ideal as it can fill large gaps in wall the most naturally.
Read more: Steps to end baseboard at stairs.

Hi, I am Roseanne Jones, an aspiring home designer that wants to make you feel more at home with your new house.With nearly five years of redecorating old residents and arranging new ones, I am confident that I can give you the best advice on your lovely place.