A bullnose tile has a smooth and rounded side that is used to finish the edge of walls, floorings, and other tile designs such as shower niches—using the rounded side as trim is an easy way to deal with sharp and unfinished tile edges.
But what if you don’t care for the bullnose and want something sleeker, more modern, or more ornate? Let us look at using caulked edges, mitered edges, and decorative or metal trim. We will take you step by step for each technique on how to tile shower niche without bullnose tiles.
Table of Contents
4 Easy Methods to Tile a Shower Niche Without Bullnose
Method 1: Caulked Edges
If you have tile material that has finished edges, such as tumbled stone or some types of porcelain, you may tile around a shower niche without any trim and instead just apply caulking on the edges.
Tools needed:
- Bathroom-safe/Waterproof Caulk, waterproofing sealant to be applied
- Caulk Gun to dispense the caulk
- Painter’s Tape to guide and make clean lines of sealant
- Damp Cloth
Step 1: Install tiles
Install your tumbled stone or porcelain tiles right up to the edges of the shower niche, fully flush or aligned with the shower wall into which the niche is recessed.
Since these tiles have finished edges, there would be no difference in appearance between the wall and niche edge.
Remember to install the sill or the bottom panel of the niche at a pitch so that water does not collect and can flow out to the shower floor.
Step 2: Apply caulk
Apply the caulk, which will act as a waterproof sealant. Lay down painter’s tape around the niche edge the width of one grout away from the edge of the last tile to help ensure a straight caulk line.
Squeeze out a small amount of caulk from the caulk gun to line the edges of the niche. Use a damp cloth (to keep the caulk from sticking) to push down the caulk in between the niche edge tiles.
Step 3: Clean any excess caulk
Remove the painter’s tape before the caulk dries and wipe down any stray smudges of caulk. Leave this for at least 24 hours to ensure it dries.
Method 2: Mitered Tile Edges
This is another method to tile a niche without the need for trimming.
A mitered tile is one where the underside of the outer edge is filed down in a 45-degree angle. This allows you to connect mitered edges to form a flush perpendicular intersection, and no raw edges of the tile can be seen, creating a seamless, minimalist look.
Possibly among the shower tile without bullnose options, this is the one that requires the most skill to install properly.
Tools needed:
- Miter saw, a power tool with a fixed circular blade used to cut angled edges for the tiles.
- Thinset, a cement specifically meant to fix tiles in place
- Square-Notched Trowel, a rectangular spade with square cut-outs around its edges.
- Tile spacers, small, thin pieces of plastic
- Grout sponge
Step 1: Measure tiles around and inside the niche
Measure out tile sizes for:
- Around the niche which will have four sides with one mitered edge each. (It is also possible to have only two sides if the shower niche runs across the whole wall length).
- Inside the niche will have five pieces, including the back wall tile, the ceiling and two sides, and the bottom shelf or the sill. All except the back wall tile will have one mitered edge each.
Measurements must consider that the mitered edges need to extend over the shelf of the niche by about ⅝ inch so that they can be sealed seamlessly all around.
Step 2: Miter the tile edges
Use the miter saw, set to a 45-degree angle, to cut angled sides on the tile edges mentioned above. Only the underside of the tile, called the ‘biscuit’, is to be cut down.
Take care not to cut through the top layer or porcelain glaze of the tile or crack the corners.
Pay careful attention that the mitered side remains thick and sturdy enough so that it will not be prone to chipping.
Step 3: Install the tiles
Prepare the thin-set to the right consistency and use the Trowel to apply them to the wall. Dragging the notched edges of the Trowel through the layer of thin-set leaves ridges and spaces for the mixture to spread evenly when the tiles are pressed against it.
- Set the tiles around the niche, remembering again that the mitered edge extends beyond the shelf. Use tile spacers to ensure even grout spacing between them.
- Apply thin-set to the shelf of the niche and lay in the ‘sill’ tile. Make sure the mitered edge is flush against the outer tile and is bound to it by a thin-set as well. Remember to make sure the sill pitches downward.
- Attach the mitered tiles to the ‘ceiling’, sides, and finally, the back wall of the niche, ensuring the seamless connection with the outside tiles.
- Wipe off any excess thin-set with the grout sponge.
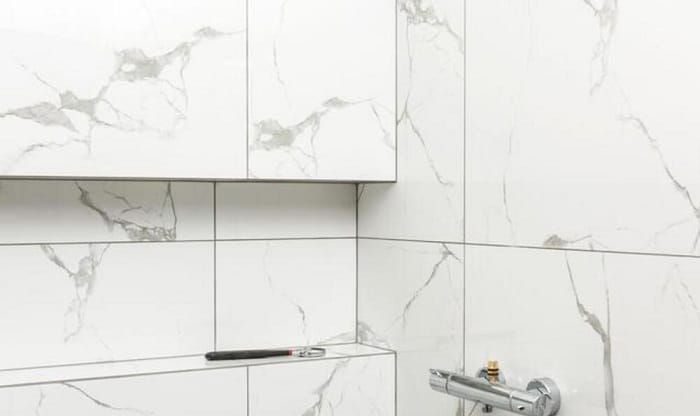
Method 3: Decorative Moldings
Tile edge trim for shower niches can also go more traditional, using decorative moldings like chair rails, cornice moldings, or pencil trim. There is a wide variety of materials, such as marble, granite, and porcelain.
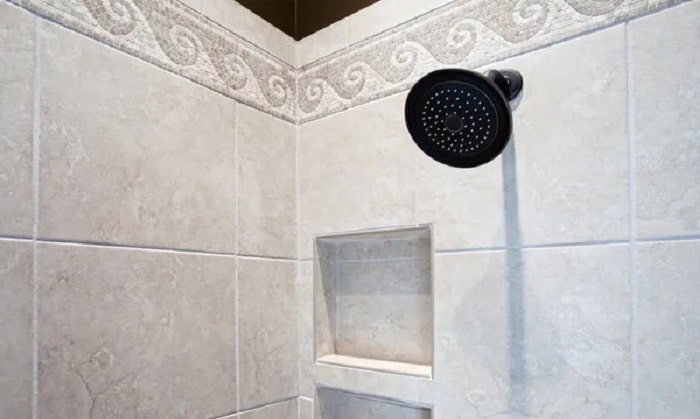
For example, as an alternative to the bullnose subway tile shower niche designs could use decorative Molding to finish the edges.
In the above picture, we have a mock-up of a shower niche subway tile with pencil trim.
These old-fashioned styles are given a new or more modern feel with the color combination of glass-like tiles and flat white Molding.
Tools Needed:
- Miter Saw, to miter the ends of the Molding for a 4-sided trim
- Thinset
- Trowel
- Decorative Molding, which you must select carefully at the planning stage
- Grout Sponge
Step 1: Select your decorative Molding
Choose a trim or mold that suits your desired look and will also fit the length and depth of the planned raw edges around the niche.
Remember that tiles and moldings are available in fixed dimensions, so measure your wall and shower niche carefully to make sure your chosen material will fit.
Step 2: Measure the edge space and cut your Molding
Make sure each piece of mold is longer than each side of the niche. This is because they must be cut at 45-degree angles to join at the corners, forming something like a picture frame just outside the niche edges.
Use the miter saw to cut the mold.
Alternatively, your shower niche might run the whole wall length where you will only need two long pieces of Molding. Make sure you have such pieces of adequate length.
Step 3: Install the Molding
Installation of decorative Molding can be done after all tiling around and inside the niche has been completed since these are only external surface-level attachments. Once the moldings have been cut down to size, prepare your thin-set.
Use the trowel to apply the thin-set to the surface where the Molding is to be attached.
If the Molding has a concave backside, apply the thin-set liberally so it will lay flush against the niche outer edge. Use the grout sponge to clean away any excess thin-set.
Method 4: Metal Trimming
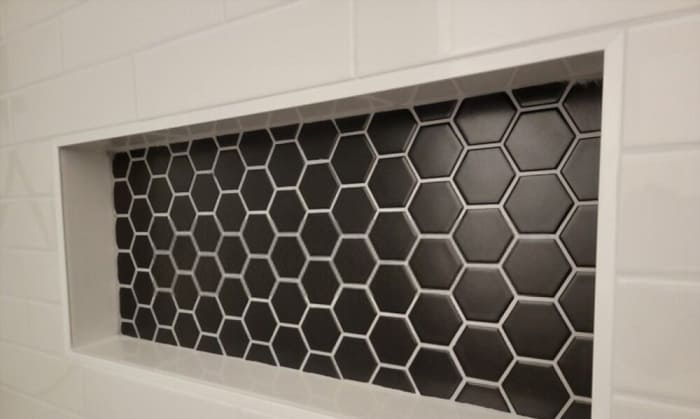
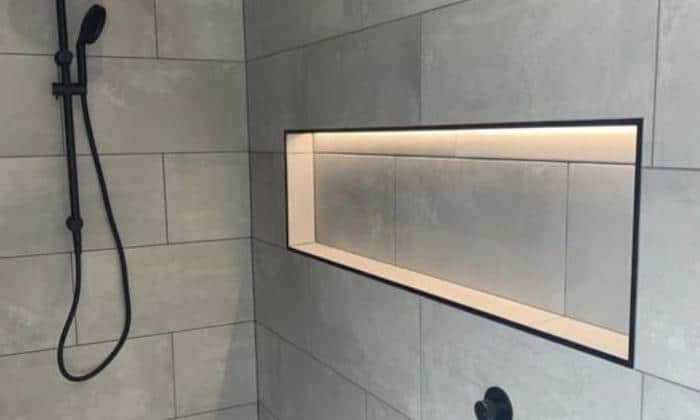
Metal trimmings round out our list of shower niche trim ideas for those looking for alternatives to the bullnose tile.
In this picture, we have a sample of a hexagon tile shower niche with a very sleek and minimalist white metal trim. For a design as busy as penny tile shower niche, the unobtrusive metal trim is also a good counterbalance.
Tools Needed:
- Miter Saw
- Tin Snips, to manually cut any excess ends of the metal trim prior to embedding under tile
- Trowel
- Thinset
- Metal Trim
- Grout Sponge
Step 1: Measure and cut the metal trims
- The metal trim has a side that embeds under tile and a side that remains visible as tile trim. Measure out your shower niche edge to determine how long to cut the metal trim, accounting for an extra edge to miter (cut into adjoining 45 degree ends).
- Similar to the decorative molding, the outer side of the metal trim has to form a ‘picture frame’ around the edge of the niche. Use the tin snips to cut off extra lengths from the inner side that embeds under the tile.
- If your niche runs the whole length of one wall, choose two pieces of the appropriate length metal trim for the upper and lower edge.
Step 2: Instal the trims and finish tiling the interior of the niche
Since this trim goes under tile, installing tiles inside the niche is best after the metal trims are in place.
After the metal trims have been cut to size, prepare the thin-set. Use the trowel to apply the thin-set to the edge where the metal trim will be embedded.
Ensure that the metal trims are aligned and flush at the corners, and that the tiles under which they are embedded are aligned and even as well.
Complete the tiles inside the shower niche, ensuring proper pitch of the sill.
Clean up any excess thin-set with your grout sponge.
FAQs
What is the best way to apply grout in a shower niche?
- First you have to give 24 hours for your thinset to dry and cure.
- Then choose a quality, waterproof grout, and select a color that blends well with your shower niche tiles and prepare it appropriately.
- Clean the surface you will apply grout to with a wet sponge, and then with your grout float, apply the grout in diagonal strokes on the tile joints. Pack it into the seams between the tile edges.
- Wait for 20 to 30 minutes, testing if the grout still gets dented by your finger. If not, you can sponge off the excess with a moist sponge, and clean up the edges gently.
How much do shower niches cost?
Cost of materials and labor can be a wide range, depending on size of the shower niche, materials or whether prefabricated or custom. The prices range from $200 and above.
Conclusion
The variety of tiling material and edge trim options gives us several alternatives to the classic bullnose tile for shower niche finishes. How to tile shower niche without bullnose? You can use:
- Caulked edges on finished stone tiles
- Mitered edges to create a seamless look
- Traditional decorative molding
- Minimalist metal trimming
When choosing the style, consider not just your design preferences, but also the measurements needed and what available materials fit those measurements. Remember that the clean and professional finish can only be possible with a well-planned and well-executed tile workmanship.
Read more other topics:
- Ways to repair a hairline crack in a porcelain sink.
- Tips to clean soap scum off glass shower doors.
- Standard toilet room dimensions.

Hi, I am Roseanne Jones, an aspiring home designer that wants to make you feel more at home with your new house.With nearly five years of redecorating old residents and arranging new ones, I am confident that I can give you the best advice on your lovely place.